
How to Create a Countdown Timer in Elementor (Step-by-Step for Beginners)
If you’re building a landing page, offer page, or flash sale page, you’ve probably seen countdown timers everywhere — and yes, they work. A timer creates urgency and encourages users to take action before the time runs out.
In this guide, I’ll walk you through exactly how to create a custom countdown timer in Elementor — even if you’re not a hardcore developer.
This method works with Elementor Free, and at the end, I’ll show a simpler method for Elementor Pro users.
What You Need Before Starting
A WordPress website
Elementor installed
A little patience 😅
No plugins required.
Step 1: Create the Timer Layout in Elementor
Open the page you want to add the timer to and switch to Elementor Editor.
- Add a Section → choose a layout width you like.
- Inside the section, add an Inner Section with 4 columns.
- Inside each column, drag a Text Editor widget or Heading widget.
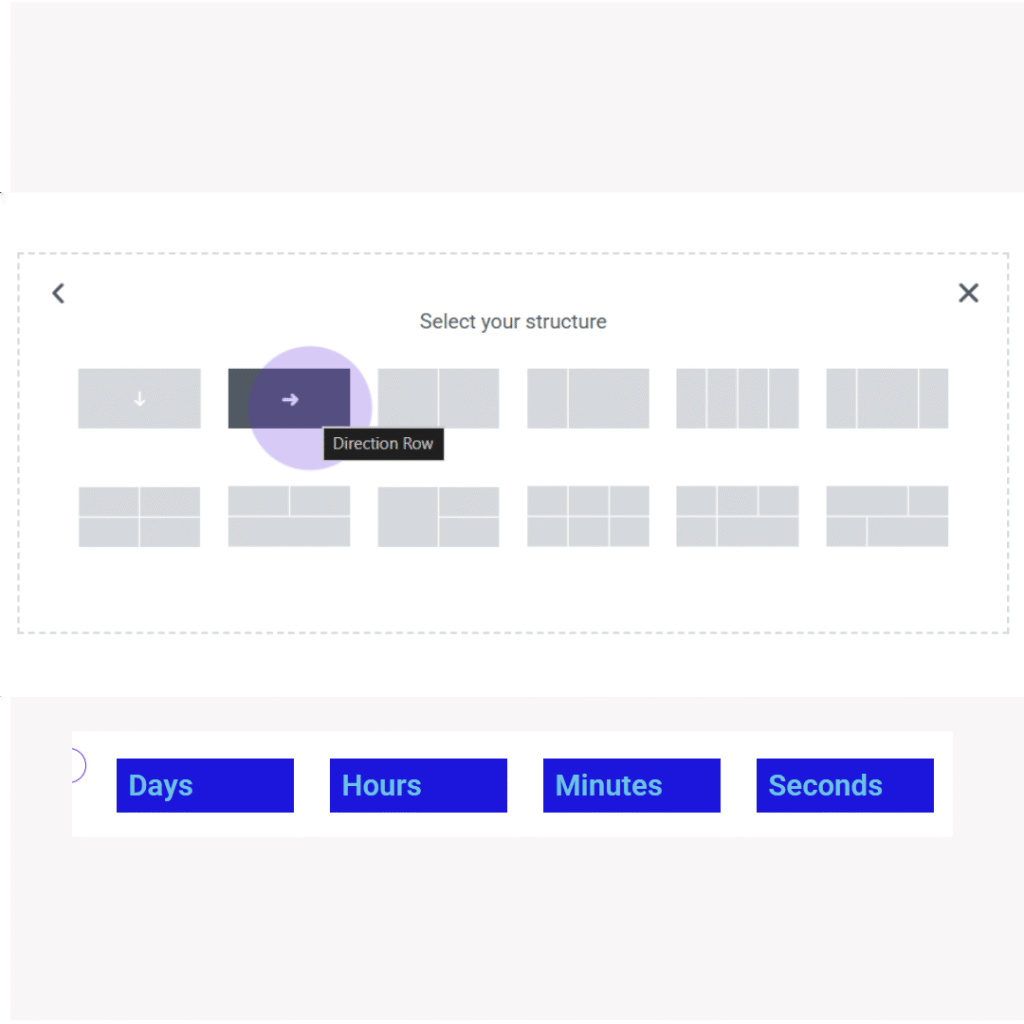
Now we’ll give each number container a unique ID so our script can update them.
Inside each box, paste this code:
<span id=”num1″ class=”num”></span>
<span id=”num2″ class=”num”></span>
<span id=”num3″ class=”num”></span>
<span id=”num4″ class=”num”></span>
———————————————————————–
You won’t see numbers yet — that’s normal.
We’ll bring it to life with CSS + JS.
But wait — you’ll need each span in a separate column.
So structure should look like:
| Column | Content |
|---|
| 1 | <span id="num1" class="num"></span> |
| 2 | <span id="num2" class="num"></span> |
| 3 | <span id="num3" class="num"></span> |
| 4 | <span id="num4" class="num"></span> |
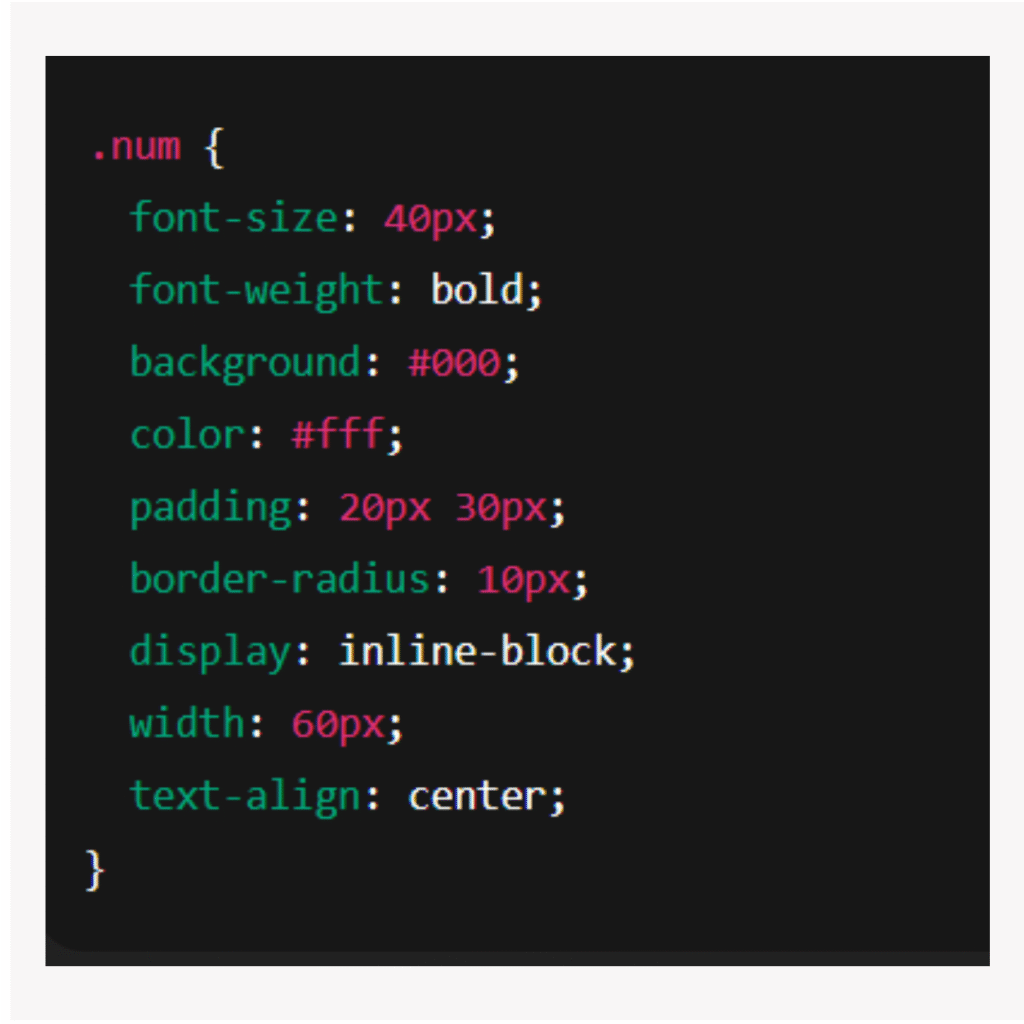
Step 2: Add Styling (CSS)
Now we make it look like a proper countdown. Go to:
Elementor → Advanced → Custom CSS
Paste this CSS:
or add the code Appearance → Customize → Custom CSS
.num {
font-size: 40px;
font-weight: bold;
background: #000;
color: #fff;
padding: 20px 30px;
border-radius: 10px;
display: inline-block;
width: 60px;
text-align: center;
}
Step 3: Add the Countdown Script (JavaScript)
Scroll to the bottom of the page → click Settings (⚙️ icon) → Custom Code → Add Code
—or—
Go to Elementor → Advanced → Custom JS (if available).
Paste:
<!–jQuery CDN link starts here–>
<script src=”https://cdnjs.cloudflare.com/ajax/libs/jquery/3.6.1/jquery.min.js”></script>
<!–jQuery CDN link ends here–>
<script>
jQuery(function() {
// Set the date we’re counting down to
var countDownDate = new Date(“Jul 31, 2022 00:00:00”).getTime();
var countdown1 = document.getElementById(“num1”);
var countdown2 = document.getElementById(“num2”);
var countdown3 = document.getElementById(“num3”);
var countdown4 = document.getElementById(“num4”);
// Update every second
var x = setInterval(function() {
var now = new Date().getTime();
var distance = countDownDate – now;
var days = Math.floor(distance / (1000 * 60 * 60 * 24));
var hours = Math.floor((distance % (1000 * 60 * 60 * 24)) / (1000 * 60 * 60));
var minutes = Math.floor((distance % (1000 * 60 * 60)) / (1000 * 60));
var seconds = Math.floor((distance % (1000 * 60)) / 1000);
function pad(n){
return (n < 10 ? “0” : “”) + n;
}
countdown1.innerText = pad(days);
countdown2.innerText = pad(hours);
countdown3.innerText = pad(minutes);
countdown4.innerText = pad(seconds);
if (distance < 0) {
clearInterval(x);
countdown1.innerText = “O”;
countdown2.innerText = “V”;
countdown3.innerText = “E”;
countdown4.innerText = “R”;
}
}, 1000);
});
</script>
Optional: Elementor Pro Method (Easier)
If you have Elementor Pro, you can skip all coding.
- Search for Countdown Widget
- Drag it into the section
- Select Timer Type (Evergreen or Due Date)
- Set expiration behavior
- Style it however you want
That’s it — no coding needed.

